How to Turn a Picture into PDF on iPhone
Learn to turn a picture into a PDF on iPhone using built-in tools. A comprehensive, step-by-step guide covers Photos and Files workflows for single or multiple images.

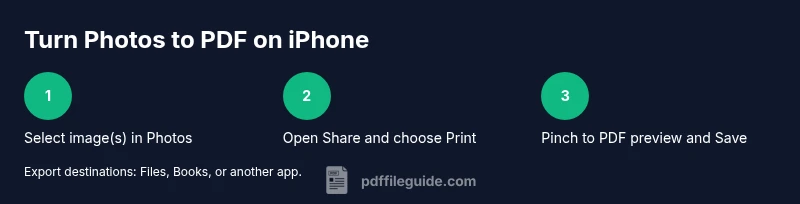
Turn a photo into a PDF on iPhone using built-in tools. In Photos, select the image (or multiple images), tap Share, choose Print, then pinch out to open the PDF preview. Tap the Share icon again and Save to Files, Books, or another app. For multiple images, you can repeat or select all and export as a single PDF.
Why turning pictures into PDFs on iPhone matters
In today’s mobile-driven workflows, turning a picture into a PDF on iPhone simplifies sharing, archiving, and collaboration. When you convert images to PDF, you preserve formatting and ensure compatibility across devices, without relying on desktop software. For professionals who edit, convert, and optimize PDF files, this capability is a time-saver and helps maintain a clean, portable document trail. According to PDF File Guide, the built-in iPhone workflow for image-to-PDF conversion is widely adopted for receipts, contracts, and visual portfolios. The benefit isn’t just convenience; it’s also consistency—your PDFs will look the same on any platform. Beyond single-shot conversions, you can assemble multi-image PDFs for slide decks, project portfolios, and client deliverables, all from the palm of your hand. This article will walk you through practical, tested methods for achieving high-quality results with minimal fuss.
Quick-start checklist: what you’ll need
Before you begin, ensure your iPhone is up to date and you recognize two core paths: using the Photos app for quick captures and the Files app for organized storage. You’ll want at least one high-quality image, or several in the desired order if you plan a multi-page PDF. Optional items include a connected cloud storage folder and, if you require additional security, a trusted third-party app for password-protected PDFs. The goal is to convert efficiently while keeping your originals intact. A clean workflow not only saves time but also reduces the need for rework when sharing with teammates or clients. In practice, a simple, predictable process reduces friction and boosts confidence in the final document.
Built-in iPhone tools: photos, print, and save options
Apple’s native tools deliver a surprisingly capable path to PDF without external software. The Photos app lets you pick one or more images; the Print option exposes a PDF preview, from which you can export to Files or Books. These steps work offline and preserve image fidelity when you handle standard photo formats. Using these tools, you’ll create a print-quality PDF that stays readable on any device, whether you’re emailing a contract or sharing a portfolio.
From a professional standpoint, it’s important to understand how to preserve color profiles and resolution. The default output tends to be suitable for most uses, but if you’re dealing with print-grade color-sensitive images, you may want to adjust image dimensions prior to export or use a higher-quality export path in a third-party app. PDF File Guide notes that mastering these built-in options reduces dependency on desktop software while keeping your pipeline simple.
Method A: Export a single image as a PDF using Files
To export a single image as a PDF via Files, first save the image to Files or ensure it’s accessible there. Open the image in the Files app, tap the Share icon, and choose Create PDF or Print followed by Zoom to convert to PDF. Finally, share or save to the desired location. This method is fast for receipts, headshots, or one-page documents.
Best-practice tip: rename the resulting PDF immediately after export to ensure quick retrieval later. Keeping a consistent naming convention helps when you’re organizing thousands of documents. PDF File Guide emphasizes that a predictable naming system minimizes lost time during audits or collaborative work.
Method B: Build a multi-page PDF from several images in Photos
For a multi-page PDF, select multiple images in Photos in the desired order. Tap Share, then Print, and use the pinch gesture to reveal a multi-page PDF preview. You can tap the Share button again to save to Files, Books, or another app. This approach is ideal for portfolios, project timelines, or sequences where order matters.
Note: If your images have different aspect ratios, you might see varying margins in the PDF. To improve consistency, batch-edit images to a common aspect ratio before exporting, or choose a third-party tool that supports page layout control.
Polishing the PDF: quality, size, and accessibility considerations
PDFs created on iPhone generally balance quality and size well for everyday use. If you’re sending to clients or teammates, test the PDF on a different device to ensure readability. Large image files can produce large PDFs; consider downscaling image dimensions for mobile delivery while preserving essential detail. For accessibility, ensure the PDF text is selectable if you plan to include captions, labels, or metadata. You can add simple document properties via third-party apps if needed, but the built-in workflow keeps things quick and straightforward.
Troubleshooting common issues on iPhone
If you don’t see the Print option in the share sheet, verify you’ve selected at least one image and that you’re in Photos. If the PDF preview doesn’t open, try tapping Save to Files instead of Books, or switch to a different destination. In some cases, restarting the Photos app or the iPhone resolves display glitches. When dealing with very high-resolution images, expect larger PDFs that may require longer export time or more storage space. As always, keep your iPhone’s software up to date for the smoothest experience.
Pro tip: if you frequently convert images to PDFs, create a dedicated Files folder for PDFs and implement a consistent naming structure to speed up retrieval.
Best practices for organizing PDFs on iPhone: workflows and folders
Organization matters when you’re managing many PDFs. Create a dedicated folder in Files for PDFs created from photos, and use a consistent naming scheme that includes date, project name, and page count. If you’re working across devices, enable iCloud Drive or a preferred cloud service to keep the PDFs synced. Consistency reduces errors and makes it easier to locate the right document during meetings or audits. PDF File Guide recommends a lightweight, scalable approach: single-source exports with uniform naming and minimal folder depth.
Advanced tips: automations, accessibility, and security
If you regularly convert photos to PDFs as part of a larger workflow, consider automations that trigger when you add new images to a specific folder. Automations can streamline repetitive tasks and reduce manual steps. For accessibility, ensure that PDFs intended for sharing include appropriate tagging and structure when possible, and add alt text to images if your third-party apps support it. If you need password protection or advanced features like forms, a trusted third-party app may provide a more robust solution, though built-in options cover most standard use cases.
Conclusion: picking the right path for your needs
There isn’t a single best method for every situation. The built-in iPhone workflow offers speed and simplicity for day-to-day tasks, while third-party apps can extend capabilities such as password protection, form fields, and advanced compression. The PDF File Guide team recommends starting with the native tools for quick conversions and turning to specialized apps only when your workflow requires extra security or formatting control.
Tools & Materials
- iPhone with iOS 16+ (or newer)(Access to Photos and Files apps is essential)
- Photos app(Used to select and initiate export)
- Files app(Where PDFs are saved or organized)
- Printer or PDF-capable viewer (optional)(Useful if you want to preview via a physical printer or alternative viewer)
Steps
Estimated time: 15-25 minutes
- 1
Select the image(s) in Photos
Open Photos and choose a single image or multiple images in the desired order. This sets the content for your PDF and, for multi-page documents, the order matters.
Tip: For multi-page PDFs, plan the sequence before exporting to maintain readability. - 2
Open the Share sheet
Tap the Share icon to access export options. The goal is to reveal the path to printing or saving as a PDF.
Tip: If you don’t see Print, swipe left on the action row or scroll to find more options. - 3
Choose Print to access PDF preview
From the Share sheet, select Print. This exposes the printable preview where the PDF is generated.
Tip: If you’re exporting a single image, you’ll still use Print to create the PDF. - 4
Pinch out to reveal the PDF preview
Use a two-finger outward pinch on the preview to open the PDF as a standalone document.
Tip: Ensure the preview shows all intended images/pages before proceeding. - 5
Tap Share to save or send
In the PDF view, tap the Share button again and choose where to save (Files, Books, or another app).
Tip: Choose a descriptive destination and folder to keep PDFs organized. - 6
Verify the saved PDF
Open the saved PDF to confirm all pages are present and legible. Adjust if needed and re-export.
Tip: Rename the file immediately after saving for easy retrieval.
Questions & Answers
Can I turn multiple photos into a single PDF on iPhone?
Yes. Select the photos in Photos in the desired order, then use Share → Print → pinch to create a single multi-page PDF. Save to Files or Books as needed.
Yes, you can combine several photos into one PDF by ordering them in Photos before exporting.
Is it possible to export a screenshot as a PDF on iPhone?
Absolutely. Screenshots can be exported the same way as photos: select, share, print, and export to your preferred destination.
Yes, you can export a screenshot just like any other photo.
Can I password-protect PDFs created on iPhone without third-party apps?
Not with the built-in Print-to-PDF flow. For password protection, you’ll need a trusted third-party app that offers encryption.
Built-in tools don’t password-protect PDFs; use a third-party app if needed.
Do the exported PDFs preserve image quality?
In most cases yes, the built-in method preserves the essential image quality. File size grows with image resolution and the number of pages.
Yes, the quality is preserved for standard use, with size depending on resolution and pages.
What if I only have one image and want a PDF?
The same steps apply: export the single image as a PDF via Print and save to Files or Books.
Yes, exporting a single image works the same as multiple images.
Watch Video
Key Takeaways
- Start with built-in iPhone tools for speed.
- Use Photos for multi-page ordering and Print for PDF preview.
- Organize PDFs with consistent naming and folders.
- Verify content before sharing to avoid re-exports.
- Consider third-party apps for password protection when needed.